 how-to
How to Identify Damage in Old Terrazzo Floors
Last Updated: October 30, 2026
Quick Summary
Identifying damage in old terrazzo starts with a slow, room-by-room visual inspection under bright, shallow-angle light, checking perimeters, traffic lanes, fixtures, divider strips and wet zones. Record each defect's type, location and size, then rate severity as low, medium or high to decide what comes next.
- Use shallow-angle light at knee height to reveal dull patches, ridges and lippage.
- Tape clear plastic sheeting down for 24 hours; condensation suggests moisture vapor through the slab.
- A fingernail that catches means a crack or deep scratch; a glide means surface wear.
- Cracks with vertical displacement, widening gaps or repeat failures are substrate questions, not flooring ones.
- Rate defects low, medium or high so records compare cleanly across every room.
Table of Contents
- Start With a Room-by-Room Visual Inspection
- How to Tell Terrazzo Floor Cracks From Surface Scratches
- Spotting Terrazzo Chips and Scratches Around Edges and Traffic Lanes
- Reading Terrazzo Stains and Etching Before They Spread
- Why a Dull Terrazzo Floor Is Often the First Warning Sign
- Separating Surface Damage From Structural Movement
- Rating Damage Severity and Deciding What Comes Next
- Schedule a Professional Terrazzo Assessment With A1 Terrazzo
- Frequently Asked Questions
Start With a Room-by-Room Visual Inspection
Identifying damage in old terrazzo floors starts with a slow, room-by-room walk of that old terrazzo before anyone touches a mop or buffer.

Work one room at a time and follow the same route every visit. Start at the entrance, scan the traffic lanes, then check the edges and corners.
- Turn on every light and open the blinds
- Get low, at knee height, and look across the surface at a shallow angle
- Bring a bright flashlight to catch haze and fine scratches
Shallow-angle light is the trick most people skip. It makes dull patches, ridges, and lippage stand out in seconds.
A Repeatable Inspection Sequence
Use this sequence in every room so results are comparable:
- Perimeter first. Walk the walls, corners, and doorways. Edge damage from carts, furniture, and cleaning equipment shows up here before anywhere else.
- Traffic lanes second. Scan the natural path between entrances, elevators, and work areas. Look for dullness, scratches, and clustered chips.
- Under and around fixtures. Check beneath planters, casework, seating, and equipment pads for ring stains, trapped moisture, and hidden chips.
- Divider strips and joints. Follow every divider strip and control joint end to end. Cracks and lippage often start at these transitions.
- Wet and chemical zones. Inspect around cleaning stations, food areas, and entries where deicers and cleaners land. Etching and staining concentrate here.
Safe Diagnostic Checks You Can Do Yourself
A few simple checks add useful information without risk. Know the limits: these are screening tools, not a substitute for a professional assessment.
- Scratch depth: drag a fingernail across the defect. A catch means it is deeper than surface haze; a glide means it is cosmetic.
- Residue check: wipe a suspect patch with a clean white cloth. A cloudy or colored transfer can indicate cleaner residue, efflorescence, or a topical coating breaking down.
- Moisture screening: tape a square of clear plastic sheeting to the floor for 24 hours. Condensation under the plastic suggests moisture vapor coming through the slab, a common cause of returning stains and coating failure.
What to Record on Your Inspection Checklist
Write it down, every time. Memory fades and patterns get missed.
- Room name and floor level
- Date and inspector name
- Damage type spotted: dullness, scratches, cracks, chips, stains, etching
- Location within the room: entry, center lane, edge, under fixtures
Photo Documentation That Actually Works
Photos only help if they can be compared. Standardize the shot:
- Pick a fixed reference point in each room, a doorway, column, or floor marker, and shoot from the same spot every visit
- Include a coin, ruler, or pen next to the defect for scale
- Take one wide shot for context and one close-up for detail
- Name files by room, date, and defect type so they sort chronologically
Consistent records turn a pile of observations into a trend line. That trend line is what justifies a repair budget, and it is the difference between reacting to damage and managing it.
How to Tell Terrazzo Floor Cracks From Surface Scratches
Terrazzo floor cracks cut into the matrix and usually run in a line; surface scratches sit on top and follow the direction of foot traffic or equipment. Once you confirm a crack, see how long terrazzo crack repair takes before committing. That is the short version. The practical test is depth, direction, and whether the defect changes over time.
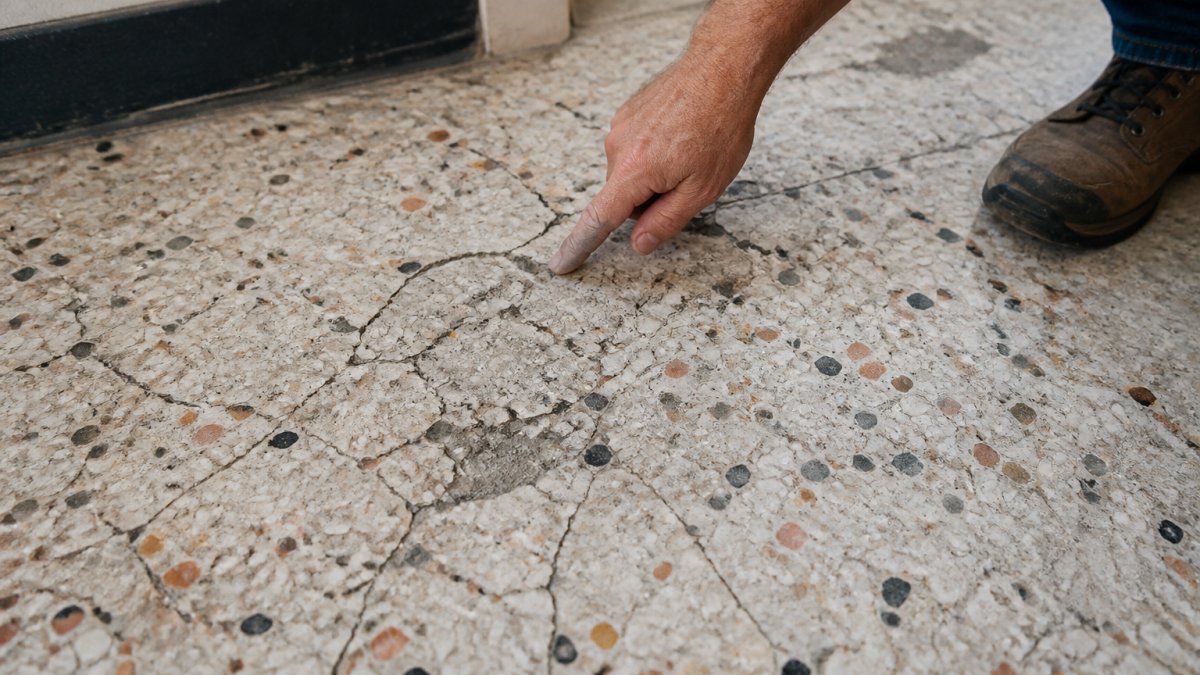
Run a fingernail across the defect. If your nail catches and drops into a groove, you are dealing with a crack or a deep scratch. If it glides over, it is surface wear. Then look at the shape:
- Scratches: shallow, often parallel, clustered in traffic lanes, and they follow the path of carts, pallet jacks, or grit dragged underfoot
- Hairline cracks: thin lines, sometimes following divider strips, and often stable for years
- Structural cracks: wider, longer, or spreading across a slab joint, and frequently aligned with control joints or construction joints
- Spalls: chips where a chunk of the matrix has broken away, usually at an edge or over a hollow spot
The Three Checks That Separate Cosmetic From Structural
The difference between a scratch you can polish out and a crack that signals slab movement comes down to three observations:
- Vertical displacement. Place a straightedge across the crack. If one side sits higher than the other, even by a fraction of an inch, the slab has moved. A scratch never creates a step; a moving crack often does.
- Crack propagation across materials. Watch whether the crack runs continuously through the terrazzo, across a divider strip, and into adjacent tile, concrete, or a threshold. A crack that ignores material boundaries is following the substrate, not the finish.
- Recurrence after repair. If a crack has been patched before and has reopened along the same line, stop treating it as surface damage. The floor is telling you the slab beneath is still moving, and another cosmetic patch will fail the same way.
A crack that is widening, has vertical displacement, or keeps returning in the same line is a substrate question, not a flooring question. Have the slab evaluated before spending on cosmetic repair, patching a moving crack hides a bigger problem and wastes the repair budget. ::: Once the structural integrity of the foundation is confirmed, you can proceed with fixing concrete impressions to restore a level surface before refinishing the terrazzo.
Reading Crack Patterns
- Cracks that mirror a control joint or slab edge usually track slab movement
- Cracks that radiate from a column, corner, or heavy equipment pad often point to point loading or a localized substrate issue
- Map-cracking (a network of interconnected cracks) can indicate a weak or deteriorating substrate rather than a single event
- Cracks confined to one traffic lane, with no displacement and no recurrence, are usually impact or overload damage to the topping
Spotting Terrazzo Chips and Scratches Around Edges and Traffic Lanes
Terrazzo chips and scratches cluster in two predictable places: the edges of the floor and the busiest walking lanes. Edges take hits from carts, gurneys, cleaning equipment, and furniture legs. Traffic lanes take the constant grind of footfall.
Check these spots first:
- Doorways and thresholds
- Corners where carts turn
- Along divider strips
- Under fixed seating and casework
Small nicks around a threshold are cosmetic. If you are wondering whether chipped terrazzo can actually be fixed, that guide covers it.
Reading Terrazzo Stains and Etching Before They Spread
Terrazzo stains and etching are chemical and physical changes to the surface, and both get worse if ignored.
Look for:
- Cloudy white or gray patches near cleaning stations
- Ring marks under planters or equipment
- Dark spots near entry mats and food areas
- Faded zones where sunlight hits daily
Etching is the one to catch early. For a step-by-step guide to preventing discoloration from spreading, see the linked article.
Stains that keep returning in the same spot usually mean moisture is coming from below, not from a spill. That changes the fix entirely.
Why a Dull Terrazzo Floor Is Often the First Warning Sign
A dull terrazzo floor is the earliest and most reliable signal that the finish is wearing down.
Dullness comes from thousands of micro-scratches that scatter light instead of reflecting it.
- Shine fades in lanes but holds at the walls
- Streaks appear after cleaning
- The floor looks hazy under overhead light
- Colors read flat or washed out
Here is the part most guides miss: dullness and damage are not the same problem.
Polishing and sealing fix different things, and choosing wrong wastes money. Compare polishing versus sealing for commercial spaces to restore shine.
Separating Surface Damage From Structural Movement
Surface damage lives in the top layer; structural movement shows up as patterns that repeat or spread across the slab.
Signs of surface-only damage:
- Scratches and dullness in traffic lanes
- Small chips at edges
- Stains and etching in isolated spots
- Wear that follows foot traffic
Signs of structural movement:
- Cracks that run long and straight across a room
- Cracks that reappear after repair
- Uneven areas or lippage at joints
- Cracks that mirror a control joint or slab edge
If a crack keeps coming back in the same line, stop patching it.
Watch out: patching a moving crack without addressing the cause wastes money and can hide a bigger problem. Have the slab checked before you spend on cosmetic repair.
Rating Damage Severity and Deciding What Comes Next
Rate each defect on urgency, not just appearance. A simple three-tier scale keeps decisions consistent across a large facility.
| Severity | What You See | Urgency | Next Step |
|---|---|---|---|
| Low | Dullness, fine scratches, small edge nicks | Monitor at next inspection | Clean properly, plan polish |
| Medium | Deep scratches, stains, etching, clustered chips | Address within the quarter | Repair and refinish |
| High | Spreading cracks, spalls, loose aggregate, uneven areas | Address now | Professional assessment |
Use the same scale in every room so your records compare cleanly. When you are ready to act, follow this terrazzo floor repair walkthrough to understand the fix process. A high rating is not a crisis, but it does mean the defect is moving faster than normal wear.
Schedule a Professional Terrazzo Assessment With A1 Terrazzo
Some damage you can spot and rate yourself. The judgment call is whether a defect is cosmetic or a sign of something deeper, and that is where an experienced eye saves money.
A1 Terrazzo has spent 35 years specializing in commercial terrazzo flooring, with installation and professional maintenance services.
- Room-by-room condition assessment
- Clear severity ratings tied to your records
- Repair and maintenance recommendations matched to your budget cycle
Contact A1 Terrazzo for current pricing or a quote.
Frequently Asked Questions
What destroys old terrazzo floors over time?
Most damage in old terrazzo comes from a mix of traffic wear, moisture, and the wrong cleaning products. Grit tracked across high-traffic areas grinds down the sealer and dulls the surface, while standing water works into cracks and along divider strips. Acidic cleaners etch the cement matrix and leave haze. Neglected maintenance speeds all of this up. Catching these causes early with a routine floor inspection keeps small surface defects from turning into loose aggregate and spalls that need restoration.
How can you tell whether a terrazzo floor is cracked or just scratched?
Run a fingernail or a plastic card edge across the mark. A scratch sits on the surface and the edge catches lightly or not at all. A true terrazzo floor crack has depth, often runs in a straight line, and may follow a divider strip or spread outward. Shine a light at a low angle: cracks cast a shadow line, scratches show as bright streaks. Any crack that is wider than a hair, or that has lifted edges, is worth a professional look.
Does old terrazzo contain asbestos?
Some terrazzo installed before the 1980s used asbestos in the cement binder or in the underlayment, so a historic floor can carry a risk. Do not sand, grind, or aggressively strip a suspect floor on your own. Have a qualified inspector test a small sample before any mechanical refinement or restoration work begins. Once the material is confirmed clean, polishing and repair can proceed normally. This step protects occupants and the crew alike.
When should damaged terrazzo be assessed by a flooring professional?
Call a professional when you see cracks with lifted edges, loose or missing aggregate chips, hollow-sounding areas underfoot, or stains that keep returning after cleaning. These point to moisture or substrate movement rather than simple surface wear. A dull terrazzo floor that no longer responds to routine maintenance is another cue. A1 Terrazzo's team can inspect the floor, rate the damage, and outline repair or restoration options before the problem spreads.